Moved
-
For English users: http://justinchronicles.net/category/en
-
For Korean users: http://justinchronicles.net/category/ko
Downsizing MS-SQL Server 2008 R2 Database Log
When MS-SQL database files need to do backup and restore, we need to shrink the size of log file as it’s rarely necessary. In order to downsize the log file, try the following script on your MS-SQL Server Management Studio.
USE [YOUR_DATABASE_NAME];
GO
-- Truncate the log by changing the database recovery model to SIMPLE.
ALTER DATABASE [YOUR_DATABASE_NAME]
SET RECOVERY SIMPLE;
GO
-- Shrink the truncated log file to 1 MB.
DBCC SHRINKFILE ([YOUR_DATABASE_LOG_NAME], 1);
GO
-- Reset the database recovery model.
ALTER DATABASE [YOUR_DATABASE_NAME]
SET RECOVERY FULL;
GO
Reference: http://technet.microsoft.com/en-us/library/ms189493.aspx
2012 in review
The WordPress.com stats helper monkeys prepared a 2012 annual report for this blog.
Here’s an excerpt:
600 people reached the top of Mt. Everest in 2012. This blog got about 5,700 views in 2012. If every person who reached the top of Mt. Everest viewed this blog, it would have taken 10 years to get that many views.
Setting Up Classic ASP Websites on IIS 7.5 with Visual Studio 2010
There are still many websites built and maintained with classic ASP because of many reasons. This post will cover two topics – how to setup classic ASP websites on IIS 7.5 and how to manage codes using Visual Studio 2010.
Conditions:
- OS: Windows 7 Professional SP1
- Web Server: IIS 7.5
- IDE: Visual Studio 2010 Professional SP1
I haven’t tested it any other than above. So, if you have a little bit different environment from mine, please bear in mind.
How to Setup Classic ASP Websites on IIS 7.5
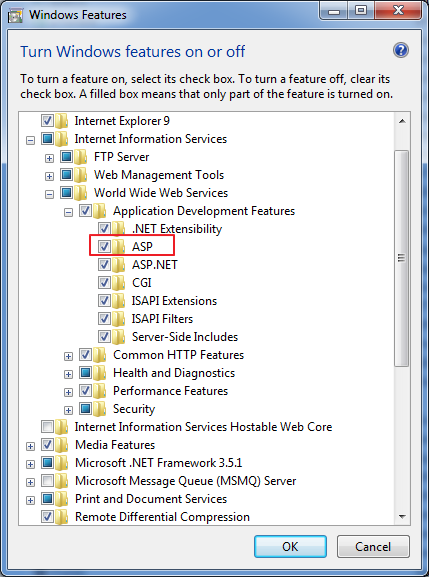
Firstly, your IIS must turn on ASP features. Go to Control Panel > Programs and Features > Turn Windows features on or off. Then, tick the checkbox next to ASP and click OK.
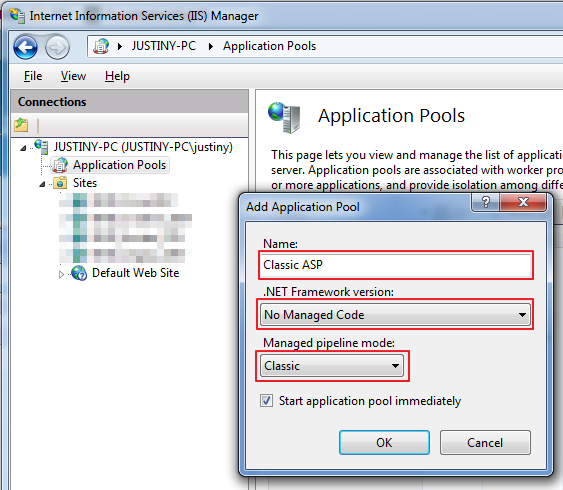
Now, your IIS is able to run ASP websites. The next step is that your IIS needs a new Application Pool for the ASP websites. Go to Control Panel > Administration Tools and open Internet Information Services (IIS) Manager. Then create a new Application Pool.
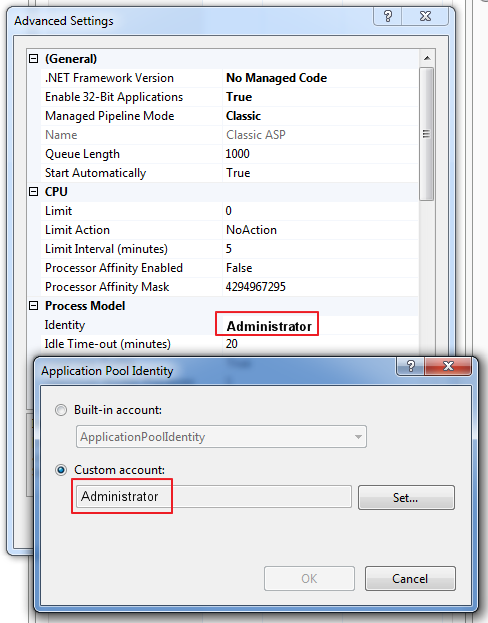
Make sure that an administrator account as a Custom account for the Application Pool Identity must be selected. From the diagram above, Administrator is selected.
Once the new Application Pool is added, a new website using this Application Pool needs to be created to host classic ASP pages.
A new website for classic ASP is now created. It’s time for the website to recognise ASP script. Go to the website you’ve just created and find ASP item under the IIS section. Click it and set the below four to “TRUE“.
Once you finish the steps above, your classic ASP website should be up and running. This IIS setting also helps your Visual Studio 2010 debug the web page script.
Now, it’s time for Visual Studio 2010 to setup to manage the classic ASP codes.
How to Manage Classic ASP Codes Using Visual Studio 2010
In order for your VS 2010 to manage the classic ASP codes, three things must be done before starting to code.
First of all, register .asp file extension to your VS 2010.
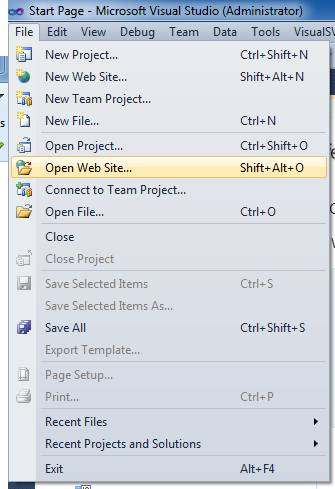
This enables you to see syntax highlighting and code intellisence feature. Now, open the website by clicking File > Open Web Site…. Make sure that it’s “File System“, not anything else.
Depending on your preference, create a new solution and add a new website project under the solution. By doing so, the website will be more manageable.
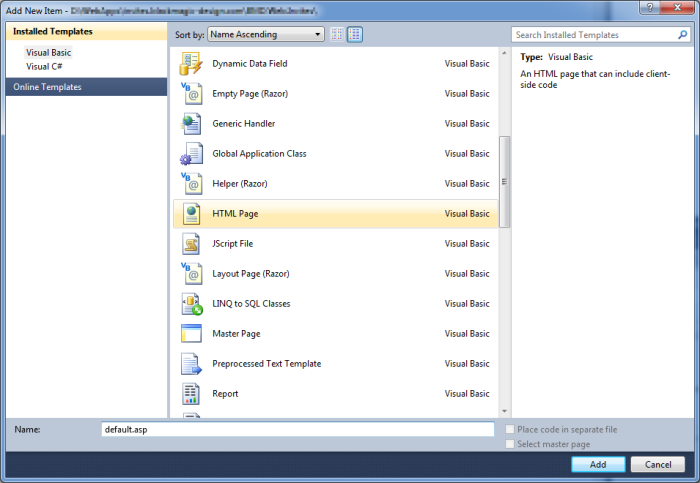
Now, it’s time to create a web page. Create a new item and select an HTML Page. As a default, the filename will be HTMLPage.htm. Rename it to default.asp.
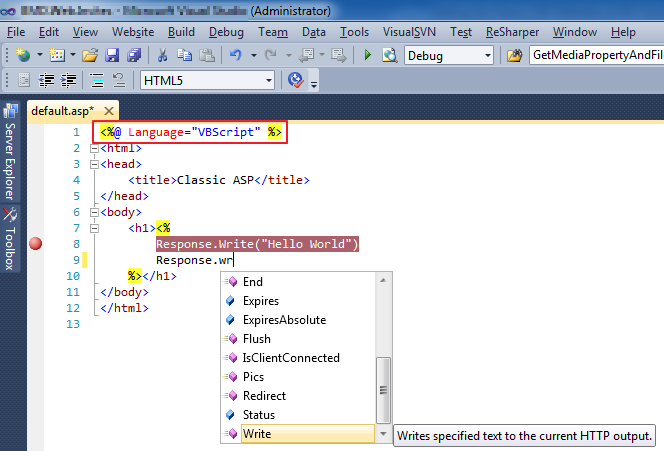
A new default.asp page is created. Type some classic ASP code into the page.
As we have already setup the syntax highlighting and code intellisense feature, in order to enjoy them, put the code <%@ Language="VBScript" %> at the first line and you will see the result like above.
Open your web browser and open the page you just created.
Please note that you can see the break point at the left next to the line number. That means we can also debug the classic ASP codes. As usual, in order to utilise the debug functions, you have to run VS 2010 as an administrator privilege. Before starting to debug, the website property must be configured.
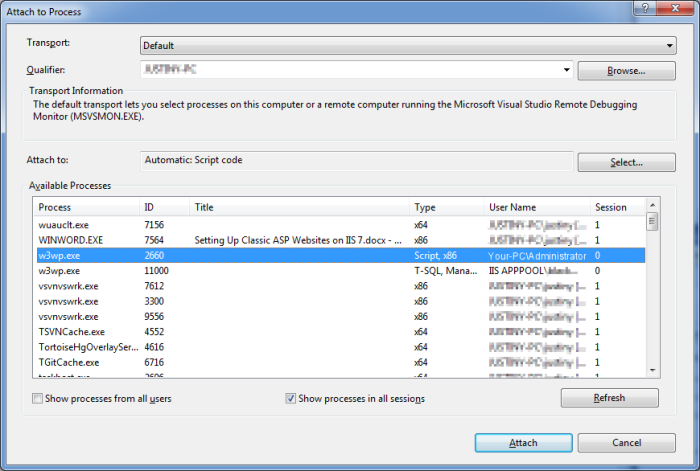
As VS built-in web server doesn’t support classic ASP, we have to use our local IIS for debug. So, setup the property like above. And use “Attach to Process” from the Debug menu. Once you run the “Attach to Process” command, you’ll get the screen like below. Find w3wp.exe bound by the account that we setup on IIS previously (that is Administrator here in this post).
Now, try to run the website again and you’ll get the break point highlighted.
So far, we have setup and reviewed how to set up classic ASP website to run on IIS 7.5 and code it on VS 2010. By default, classic ASP is not chosen by IIS and VS 2010. So, some configuration change must be performed in order for that.
Try it and enjoy your ASP coding.
A Few Things Should Know to Enjoy Holiday at Singapore
Going overseas for a holiday must be an exciting experience. However, it can be disastrous unless getting well prepared. There are a few things you should know while you are planning to stay in Singapore. Please note that this is based on my personal experience, so not everyone will get satisfied with this.
Get Your Smartphone Ready
There are several mobile carriers in Singapore, but I would recommend SingTel as it is the biggest and most reliable. It is the same as KT in South Korea and Telstra in Australia. If you want to buy a prepaid SIM, go to currency exchange service once you get out of the custom.
http://www.changiairport.com/at-changi/facilities-and-services/money-changer
There are, of course, heaps of service retailers, but using the currency exchange service next to the door of the custom is the easiest and fastest way. The currency exchange service is located in Terminal 2 but I’m pretty sure that the same currency exchange service selling the prepaid mobile SIM must exist in the other two – Terminal 1 and Terminal 3.
Depending on your days of stay, you will be asked to buy a different amount, but $28 prepaid plan is the most common. Once you choose this plan, the service staff will setup your mobile phone to use SingTel, such as APN or something like that. Once your phone gets ready to use, you will be asked to call *363 to get your mobile phone ready to use mobile broadband service. Then you will get a text message from SingTel. Follow the instruction of the text message. The most common data plan is 1GB for 7 days for $7. After the 7 days expiration, you can just add $1 for additional 10MB for 7 days with the remainder rolled over. That $7 and extra $1 is deducted from $28 that you have paid already. How cool, isn’t it?
Store Your Excessive Baggage
Each terminal has got a baggage storage service. If you have a few suitcases that you do not need while staying in Singapore, you can simply leave them to the baggage storage service. It costs about $5 per day per bag. But remember that you should let them know about your next flight schedule to get your baggage prepared to pick up later on.
http://www.changiairport.com/at-changi/facilities-and-services/baggage-services
Get Tourist Pass Ready
If you want to use public transport in Singapore, using Tourist Pass will be the best option for your budget. It costs only $20 for unlimited number of travels for three days using subway trains – MRT and LRT – and buses. The pass is sold at the airport station, but its operating time is very limited – 12.00 to 15.45 and 16.45 to 19.30. So, you should ask any staff at the visitor centre for more information about that. If you arrive outside the time span, you should go to another station to buy the pass. Make sure that your children must pay for the same fee unless their height goes under 0.9 metre. If you provide your children’s passport to prove that they are less than 7 years old, they will get $15 discount.
We have reviewed three things that you should know before enjoying Singapore. If you are well planned and well prepared, your travel will be much better than expected.
Enhanced Preview for Umbraco
Existing preview function in Umbraco only supports actual pages, not contents shared within a website. This approach is logically correct as shared contents are not independent pages. However, there must be demands to preview shared contents before publishing them.
This Umbraco extension enables for content editors to preview what they have written and how the contents would be looking like, before they publish the contents.
Basic idea is simple. Umbraco provides an alternative template function by using AltTemplate querystring.
This extension allows users to assign certain document types to templates. So, when users click the preview button, this extension starts looking up the configuration values to for document type – template mappings.
<enhancedPreviewConfiguration>
    <items>
        <clear />
        <add alias="Product" template="StandardPage" redirectUrl="/products/product/{0}" />
        <add alias="Company" template="StandardPage" redirectUrl="/companies/company/{0}" />
    </items>
</enhancedPreviewConfiguration>
Like the example above, the extension registers a config file, EnhancedPreviewConfiguration.config under /config/ directory. Based on this example, a document type Product will use the template StandardPage for its preview mode. After the preview, the preview page will be redirected to /products/product/[productId] page.
If you guys are interested in, please visit the following websites.
How to Install the Latest Version of Mercurial Web Repository on Windows 2008 Server R2
It’s a super pain to install HG on Windows 2008 Server R2. This post is based on Firegarden’s article and has additional information from other resources.
Prerequisites
- Windows 2008 Server R2
- The latest version of Python: 2.7.3 (at the moment of writing)
- The latest version of PyWin32: Build 217 (at the moment of writing)
- The latest version of Mercurial: 2.2.2 (at the moment of writing)
Setup Process
Please note that if your choice of Python has to be consistent. In other words, if you choose Python of x86 version, all other applications have to be x86 version; if you choose Python of x64 version, all other applications have to be x64 version; otherwise, this will not be working for your system.
1. Installing Python.
As Mercurial doesn’t support Python 3.x, the latest version of Python we can use is 2.7.x.
- Go to the Python download page. http://www.python.org/download/releases
- Download the latest 2.7.x version of Python. Choose the platform carefully, if to be x86 or x64.
- Install Python downloaded. Make sure that the installation must be conducted by an administrator permission. During the installation process, let the installer set the default installation directory, which will be
C:\Python2x. - Add the Python path to the system environment path.
- Open “
Control Panel” > “System and Security” > “System” > “Advanced System Settings“ - Click “
Environment Variables...” and find the “Path” variable under “System variables” section. - Append “
;C:\Python2x;” to the “Path” value. Make sure that the path value is delimited by semi-colons. - Open a command prompt and type “
python” at any directory and you will get into the python console. PressCTRL+Zto exit from the console. - If you can’t run the “
python” command on the command prompt, check the step4.3again. If the path has been correctly set, your server might need to reboot.
- Open “
2. Installing PyWin32
Again, your choice of platform has to be consistant; if you have installed Python of x86 version, this also has to be x86 version; if you have installed Python of x64 version, this also has to be x64 version.
- Go to the Python for Windows Extensions download page. http://sourceforge.net/projects/pywin32/files/pywin32
- Go to the latest build and download an appropriate one corresponding to your Python version and platform. The filename looks like “pywin32-xxx.win32-py2.7.exe”
- Install the PyWin32 downloaded. Make sure that the installation must be conducted by an administrator permission.
- In case of error you might face at the end of the installation process. The message will look like:
close failed in file object destructor:
sys.excepthook is missing
lost sys.stderrThis is because of your administrator permission. For workaround of this: http://sourceforge.net/mailarchive/message.php?msg_id=29300152
- Click “
Start Menu” > Right click on “Computer” > Click “Manage“. - Go to “
System Tools” > “Local Users and Groups” > “Users“ - Create a new account named “
Admin” and assign it to the “Administrators” group. - Open a command prompt as an administrator and type
runas /user:Admin pywin32-xxx.win32-py2.7.exeand type password you set previously.
- If you get an error “
Access is denied“, close the command prompt and open it again as an administrator.
- Click “
3. Building and Installing Mercurial from the Source Code.
As the latest version of Mercurial installer (2.2.2 at the moment of writing) is built with Python 2.6.6, the installer will not be running on our server. So, we need to build the source with Python that we have installed into our system.
- Go to the Mercurial download page. http://mercurial.selenic.com/downloads
- Download the source code and unzip it. We assume that the unzipped directory is “
C:\hg-source“. - Open a command prompte as an administrator and move to the unzipped directory.
- Run the following command to build Mercurial
python setup.py --pure build_py -c -d . build_ext -i build_mo --forceEven if you meet a warning like “
warning: hgbuildmo: could not find msgfmt executable, no translations will be built“, just ignore it. - Run the following command to install Mercurial
python setup.py --pure install --forceMercurial will have been installed at “
C:\Python2x\Lib\site-packages\mercurial“ - In order to execute to “
hg” command at anywhere, try the followings:- Copy “
c:\python2x\scripts\hg.bat” to “c:\python2x“ - Open
hg.batand modify the line
"%~dp0..\python" "%~dp0hg" %*to
"%~dp0python" "%~dp0\scripts\hg" %*
- Copy “
4. Installing ISAPI-WSGI Module
For better performance, we need to install ISAPI-WSGI module to build a DLL file.
- Go to the ISAPI-WSGI download page. http://code.google.com/p/isapi-wsgi/downloads/list
- Download the latest version of the source code. The precompiled version will not work for our setup.
- Unzip it. We assume that the unzipped directory is “
C:\isapi-wsgi-source“. - Run the following command to compile the source
python setup.py install
5. Seting up IIS for the Mercurial Web Repository
As IIS doesn’t recognise Python and Hg natively, we need to setup IIS manually.
- Open IIS Manager.
- Create an application pool called “
Mercurial” with the following configurations:- Set “
.NET Framework Version” to “No Managed Code“ - Set “
Enable 32-Bit Applications” to “True“, only if you have installed x86 version of Python.
- Set “
- Create a website on IIS for the web repository. We assume that the directory is “
C:\inetpub\hg” and its URL is “hg.myserver.com“. This has to point the application pool “Mercurial“. - Copy the “
hgwebdir_wsgi.py” file from the Mercurial source code downloaded to “C:\inetpub\hg“. It is located in “C:\hg-source\contrib\win32“. - Open the “
hgwebdir_wsgi.py“, find and edit the parameters below:
hgweb_config = r'c:\inetpub\hg\hgweb.config'
path_prefix = 0 - Create a new “
hgweb.config” file in “C:\inetpub\hg” and place the following into it.
[paths]
/ = c:\Repositories\* - Open a command prompt as an administrator and move to the directory “
C:\inetpub\hg“. - Run the following command to build the ISAPI-WSGI library.
python hgwebdir_wsgi.py - Open Handler Mappings and click “
Add Wildcard Script Map...” with followings:- Set “
Executable” to “c:\inutpub\hg\_hgwebdir_wsgi.dll” that has been created from the step5.8. - Set “
Name” to “Mercurial-ISAPI“. - If you are asked to allow the ISAPI extension, click “
YES“.
- Set “
So far, if everything is done smoothly, you can browse the web repository by typing the URL “http://mg.myserver.com” into your brower’s lcation bar.
This is optional. If you want to tie basic authentication function to the web repository, try the following steps.
6. Setting up Basic Authentication of IIS onto the Web Repository
- Create users and a user group.
- Click “
Start Menu” > Right click on “Computer” > Click “Manage“. - Go to “
System Tools” > “Local Users and Groups” > “User Groups“ - Create a user group, named “
Mercurial Users“ - Go to “
System Tools” > “Local Users and Groups” > “Users“ - Create as many users as you want and assign the users to the “
Mercurial Users” group.
- Click “
- Set the permission for the “
Mercurial Users” group to only allow the access to “C:\inetpub\hg“. - Create a self-signed certificate and bind the
HTTPSprotocol with “hg.myserver.com“.
Once everything is done, type “https://hg.myserver.com” and you will be asked to login to the site.
It would be great if you guys who are reading this article share your experiences regardless of success or failure.
When Getting 404 Error While Using FancyBox 1.3.4 jQuery Plugin
According to the article http://stackoverflow.com/questions/6591288/im-getting-404-errors-with-fancybox-images, there are 404 errors occur while using the FancyBox 1.3.4 jQuery plugin. I had the exact same errors and, because of this, my IIS has almost gone down to write server error logs.
In order to fix this issue, without modifying the plugin core, simply add the URL rewrite rule into your web.config.
<configuration>
	...
	<system.webServer>
		...
		<rewrite>
			<rules>
				...
				<rule name="Fancybox image path correction" stopProcessing="true">
					<!--
						Assumptions:
						- the page URL is http://yoursite.com/contents/pagename.html
						- the 404 error happens when the server tries to access to http://yoursite.com/contents/fancybox/image_file_name.png
						- FancyBox jQuery plugin is located under /scripts/jquery.fancybox-1.3.4
					-->
					<match url="^contents/fancybox/(.+).png$" />
					<action type="Rewrite" url="/scripts/jquery.fancybox-1.3.4/fancybox/{R:1}.png" />
				</rule>
				...
			</rules>
		</rewrite>
		...
	</system.webServer>
	...
</configuration>
Node that this is just a workaround, not the solution. The best thing is modifying the plugin core.
Removing the “x_” Prefixes Injected by AntiXSS Library, from the “id” and “class” Attributes
Microsoft Web Protection Library provides strong security protection while building a web site. By using this library, the web site can avoid XSS attacks. One of the benefits using this library is that the web site can sanitise users’ input, that means the HTML input can be filtered by the library.
However, during the sanitisation process, a prefix, "x_", intentionally prepends both "id" and "class" attributes of each HTML element. The reason is that the sanitisation process cannot guarantee which "id" and "class" values are safe or not, so each "id" and "class" attribute have their prefix "x_" as a result. This is, of course, not desirable. So, developers have to get rid of those prefixes from the HTML output.
public static string RemoveSanitisedPrefixes(string html)
{
	Match match = Regex.Match(html, "(id|class)=\"?(x_).+\"?", RegexOptions.IgnoreCase);
	if (match.Success)
	{
		string key = match.Groups[2].Value;
		html = html.Replace(key, "");
	}
	return html;
}
Once your HTML contents are sanitised by Microsoft.Security.Application.GetSafeHtml() or Microsoft.Security.Application.GetSafeHtmlFragment(), pass the sanitised HTML value to the method above, and you’ll get the "x_" removed HTML contents.
Quiz: 3-6-9 Game with Your Programming Language
There is a very popular game in Korea, called “3-6-9”. Its rule is very simple:
- A player starts counting from 1.
- Next player count the number added 1. Repeat this rule until one player fails counting.
- However, when a player meets a number containing digits such as 3, 6, or 9, the person has to do a clap for the number of times.
- This is the example of playing:
- 1, 2, “clap” (3), 4, 5, “clap” (6), 7, 8, “clap” (9), 10, 11, 12, “clap” (13), 14, 15, “clap” (16), 17, 18, “clap” (19), 20, 21, 22, “clap” (23), 24, 25, “clap” (26), 27, 28, “clap” (29), “clap” (30), “clap” (31), “clap” (32), “clap clap” (33), “clap” (34), “clap” (35), “clap clap” (36), “clap” (37), “clap” (38), “clap clap” (39), 40, 41, 42, “clap” (43), …
The question is…
Use your preferred programming language, create a function or method to perform this game up to 100.
And my solution using C# is… (substituted “clap” with “X”)
using System;
using System.Collections.Generic;
using System.Text.RegularExpressions;

namespace Aliencube.Quizes
{
	public partial class ThreeSixNine
	{
		public static string Execute(int maxNumber = 100)
		{
			List<string> results = new List<string>();
			for (int i = 1; i <= maxNumber; i++)
			{
				int xs = Regex.Matches(Convert.ToString(i), "[369]").Count;
				results.Add(xs == 0 ? Convert.ToString(i) : new String('X', xs));
			}
			return String.Join(" ", results);
		}
	}
}
How’s yours guys?









You must be logged in to post a comment.